

This time of year makes every single high school senior experience “senioritis”. It’s the overwhelming urge to be done with school, to be FREE from teachers and homework. The countdown to graduation begins. If you know a high school senior, you know this time of year is also incredibly stressful. The exams, the college applications, the scholarship essays, the expenses of graduation and senior prom… it’s just a crazy time of year!
My kids are too young (my oldest is turning 10 next month!), but I do have a beautiful sister-in-law who is graduating with the class of 2015. She just returned from her senior class trip that took her, for the first time, to New York City! Now it’s time to get ready for senior prom, and for the big one – graduation. I remember her as a little girl since her brother and I started dating such a long time ago.
Our relationship is a unique one. When I was pregnant at 17 and my mom had passed away, I ended up moving in with my husband’s family and that meant “inheriting” my now sister-in-law as a little sister. I’m pretty sure she read my diary – who wouldn’t?! Regardless, since then I’ve always thought of her as just a sister, a little sister I was lucky to eventually have in my life. Then, as my kids were born and we invited her on day trips and vacations, she become like one of my own. Hey, that random lady at IHop totally thought she was my 16 year old daughter and even said I looked too young to have a 16 year old! *wink*
Sitting here, thinking about how grown up and mature she is now compared to that shy little girl of then, I am so proud of her. She’s exactly the kind of little sister/sister-in-law one hopes to have. I wanted to make her something special so she can remember the four years she spent in high school. Those are the years that made her who she is today. Being a trendy girl, I knew it had to be something fun… and with her going to college and living on campus, she’ll need some decor!
For this project, I went with just one letter. You could easily do smaller cardboard letters and spell out a full name, but I went with the biggest M I could find!
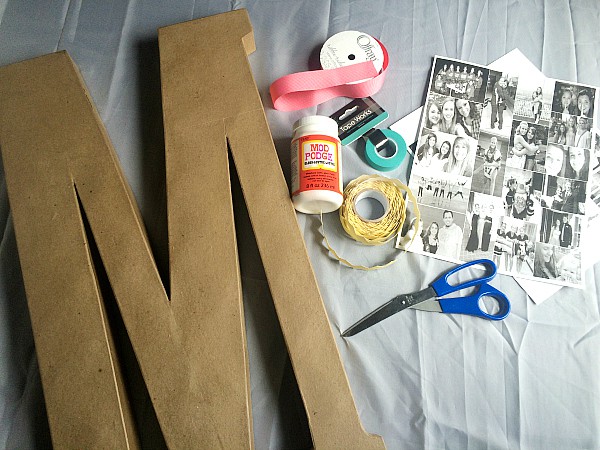
Here’s what you need:
Cardboard (paper mache) letter of choice
Mod Podge
Brush (I used a foam brush for applying the MP)
Tons and tons of photos (I prefer the black and white look)
Embellishments like washi tape, ribbon, glitter, sequins, etc
Print all of your photos on plain printer paper. I used PicMonkey to create collages and various sizes of the photos and then cut them out individually. You’ll want various sizes so you can cover your letter’s front.
*Optional* I spray painted the front of the letter, where the pictures are going to go, black. That way if I had any small blank areas, it wouldn’t be as obvious as the plain cardboard coloring. If you do this step, let dry completely before advancing. You could also paint the entire letter.
Once you have your photos all cut out (and don’t be surprised if you need more, I revisted my computer and printer several times for more!), you’ll want to start arranging them and creating a rough layout.

This was my first attempt and I knew right away I would need a lot more photos! If you can space it evenly, you could leave some room in between but for a true collage effect you want little to no background showing.
Now, I’m no pro with Mod Podge. Like, at all. That said, once your pictures are laid out you’ll want to brush on a very thin layer of MP to the letter, in small section. Lay the photos gently and using your fingers smooth outward to avoid wrinkles. I kind of just “went for it” and went picture by picture.
If you have overlapping, where the photo is bigger than your letter you have two options. Cut to fit better or bend it around the edge. I decided to cut to fit anything that was an outside edge, and overlap anything on the inside (close to V of the M).

Let dry completely and come back for another thin layer of Mod Podge. I printed some cute phrases (name, Class of 2015, etc) to fill in where I had some of the blank space showing.
Since this is meant to be hung on a wall, the backside can be left as-is. The edges though, they needed something. I had purchased some washi tape in one of her favorite colors, so I carefully lined the outside edges.
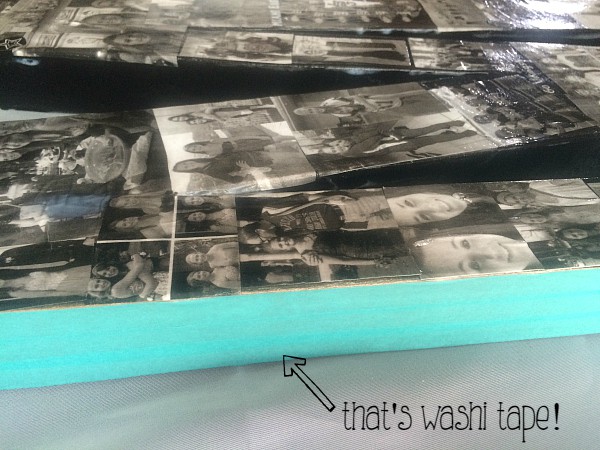
The edges would be great to add some sparkle too, to really make the decor fun. Or you can print tiny pictures to fit there!
Using coral colored ribbon, I stapled it to the back of the M and tied a knot and that’s it!

It can be hung on the wall of her dorm room, or leaned against the wall on top of a desk or bookshelf!

It’s a great piece to add character to, so get funky with glitter and washi tape and make it as unique as your grad!
Speaking of personalized…
TinyPrints has some of the most gorgeous announcements that I’ve seen! They are stylish with fun fonts, foil-stamped designs, letter press designs, even matching envelopes!
Seen here are:
Foil Stamped Graduation Announcement – (5×5 – Scallop trim) Fantastic Graduate
Foil Stamped Graduation Announcement – (5×5 – Square trim) Gleaming Success
Letterpress Graduation Party Invitation – 7×5 – Ticket trim)
Foil Stamped Graduation Party Invitation – 5×7 – Rounded Trim) Elegant Academia
(Not pictured) Letterpress Graduation Announcement – (5×7 – Square trim)
If you’re looking for beautiful (that are personalized!), head to TinyPrints!
This post may contain affiliate links.